Find us on facebook

Showing posts with label joomla. Show all posts

Oct 18, 2013

Add Horizontal Menu in Joomla 3.1

Today we are going to create a horizontal menu. See Figure 1.


Figure 1

First Let's we edit the css file. Add following code into your css file.


#topmenu li

{
  display:inline;
  padding-left:7px;
}
#topmenu li a
{
   text-decoration:none;
   color: #FFFFFF;
   font-family: verdana;
   font-size: 12px;
   padding-left: 12px;
}


Then go to the "Add New Menu" as shown in Figure 2.


Figure 2

Add new menu and Menu Items to that menu.

Then go to Module Manager. See Figure 3.

Figure 3

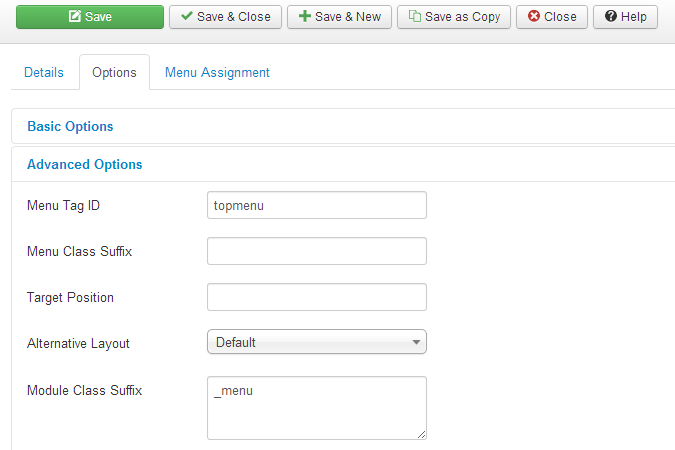
Add new module and go to Options tab and select Advanced Options. Type Menu Tag ID same as you mentioned in your stylesheet. Here we used "topmenu" as our menu ID in stylesheet code. So here we enter topmenu in Menu Tag ID Field.


That's all. Now you will have a horizontal menu as shown in Figure 1.

Bind articles to menu tabs in Joomla 3.1


Hi friends, this is a very simple thing but I thought it’s better to write a post for the friends who are new to joomla CMS.  Today we are going to navigate through pages using a menu on a web site. Let’s say we have a top menu and when we click on Home tab we want to see home page’s article and when we click on About tab we want to see About us page’s article as shown below.

Figure 1: Home Page


Figure 2: About Us Page


First Let's add two new article categories. 

Step 1: 
Go to Add New Category as shown below.


Step 2:
Click on New button


Step 3:
Add new Category "Top Content"


Step 4:
Click on Save & New button and add the second category "About Us"

Step 5:
To add new article, go to Add New Article menu as shown below


Step 6:
Write article and choose related category from the categories. You can use other tabs to change publishing settings and many more settings according to your requirements. 


Step 7:
Click on Save & New button and add the second article same way.

Step 8:
Then we want to add two modules. Go to Module Manager as shown below.


Step 9:
Click on new button


Step 10:
Add New module. Here remember to select the position where you need to locate this article on the page.


Step 11:
Go to Options tab and select the category of the article that you want to display in the selected position


Step 12:
Select the pages that you want to display this article. 


Step 13:
Add the second module same as the first one. Then go to "Add New Menu Item" as shown below. Remember here we have created our main menu and we need to add two new menu items into the main menu.


Step 14:
Add New Menu Item as shown below. Remember to select Menu Item Type as "Single Article" and then select the article that you want to see when you click on the Menu tab.


Step 15:
Click on Save & New button and add the second menu item. Then Do the same as before.

That's it. Now you are ready to test it.


Oct 14, 2013

How to convert (X)HTML/CSS template into Joomla Template (Joomla 3.1)

Your folder structure should be as below.

figure 1.1

"mytemplate" folder will contain all the files and folders that are used to develop web template.

"css" folder contains all the stylesheets related to the template.

"images" folder contains all the images that are used in the template.

First put your style sheets into css folder and put your all images into images folder. Rename your main stylesheet as "template.css"

Put your index.html file into "mytemplate" folder and rename it as index.php as shown in figure 1.1.

At the top of the index.php file, insert the following code segment and remove your <!DOCTYPE> and <html> tag. Joomla template begins with following code segment.

<?php defined( '_JEXEC' ) or die( 'Restricted access' );?>
<!DOCTYPE html>
<html xmlns="http://www.w3.org/1999/xhtml" xml:lang="<?php echo $this->language; ?>" lang="<?php echo $this->language; ?>" >

Then remove your HTML head part. That is from <head> to </head>. And insert the following code.

<head>
<jdoc:include type="head" />
<link rel="stylesheet" href="<?php echo $this->baseurl ?>/templates/system/css/system.css" type="text/css" />
<link rel="stylesheet" href="<?php echo $this->baseurl ?>/templates/system/css/general.css" type="text/css" />
<link rel="stylesheet" href="<?php echo $this->baseurl ?>/templates/<?php echo $this->template; ?>/css/template.css" type="text/css" />
</head>

After this the body part of the page comes.

<body>
<div id="background">
<div id="Background"><img src="<?php echo $this->baseurl; ?>/templates/<?php echo $this->template; ?>/images/Background.png"></div>
<div id="Layer1"><img src="<?php echo $this->baseurl; ?>/templates/<?php echo $this->template; ?>/images/Layer1.png"></div>
<div id="Layernew2"><jdoc:include type="component" /></div>
<div id="Layer4"><img src="<?php echo $this->baseurl; ?>/templates/<?php echo $this->template; ?>/images/Layer4.png"></div>

</div>
 </body>

And finally end the code with " </html>" tag.

Now we have created our index.php file.

Now the remaining part is essential for making the template. We must create templateDetails.xml file. Without this file, joomla will not recognize our template. Let's do it.

<?xml version="1.0" encoding="utf-8"?>
<extension version="2.5" type="template">
        <name>mytemplate</name>
        <creationDate>2013-10-14</creationDate>
        <author>Ishara Maddumage</author>
        <authorEmail>miprabuddini@gmail.com</authorEmail>
        <authorUrl>http://pisharamaddumage.wordpress.com</authorUrl>
        <copyright>Ishara Maddumage  2013</copyright>
        <license>GNU/GPL</license>
        <version>1.0.2</version>
        <description>My Joomla Template</description>
        <files>
                <folder>css</folder>
<folder>images</folder>
<filename>index.php</filename>
<filename>templateDetails.xml</filename>

        </files>
        <positions>
                <position>breadcrumb</position>
                <position>left</position>
                <position>right</position>
                <position>top</position>
                <position>user1</position>
                <position>user2</position>
                <position>user3</position>
                <position>user4</position>
                <position>footer</position>
        </positions>
</extension>

Here remember to insert all the files and folders that you use for the template within <files></files>.
within <folder> </folder> you can define entire folder. With <filename> </filename> you can define each file.

Don't worry about the positions we used here. Because those are the module positions that are used in default joomla template. We can use those positions in our body section according to our requirements.

Now we have completed with the template.

Finally put your "mytemplate" folder into your joomla->templates folder. Login into the admin panel and go to Extensions->Extension Manager and click on Discover to find your template. Then select your template and click on install to install it. Now your template should show in Template Manager. You can go to Extensions->Template Manager and make your template default.

That's all and now you will see your joomla template.